That Freekick Challenge How to Score Free Kicks in TFC
Inside-foot curl recipe, power band, and perk picks that actually finish.
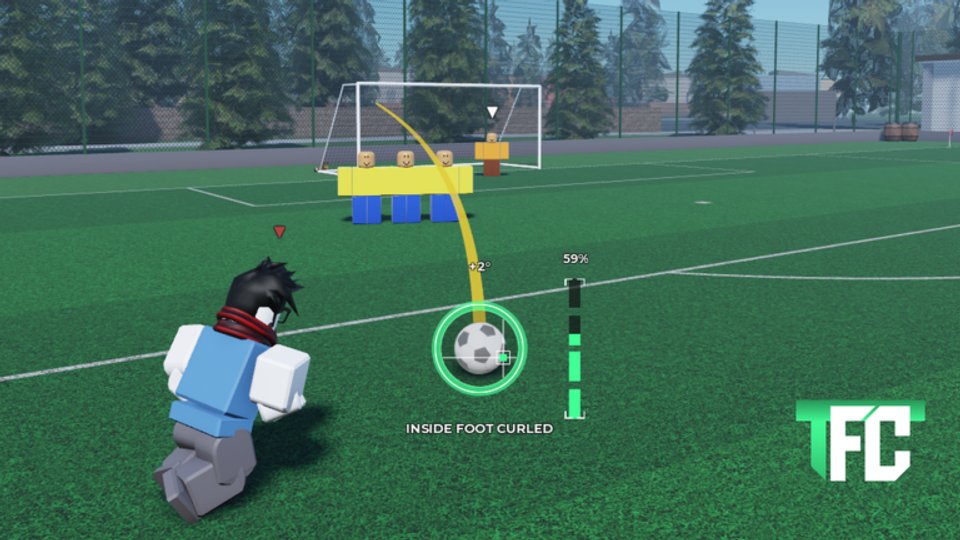
Scoring in That Freekick Challenge is a repeatable process, not a lucky max-power blast. The shot that wins most practice sessions and challenge 1v1s is an inside-foot curl that starts near the edge of the frame, rises over the wall, then bends back inside the far post before the keeper can cover. This guide locks that recipe, explains why 60–65% power beats full charge, and shows how Zone and Rocket amplify a clean route.
If you are brand new, skim Getting Started and Controls first. Build the layout with Free Kick Setup, and use Beat the Wall whenever the first defender eats your attempt.
The four-step scoring recipe
Follow these steps in order on every kick until they feel automatic.
- Pick the target — Aim just inside a goal post or into the open pocket the keeper is not shading. Do not aim dead center against a set keeper.
- Shape the yellow trajectory — Point the guide so the planned path clears the wall and approaches your target. Use W / S to raise or lower the arc and A / D to tweak approach angle.
- Add inside-foot curl — Press Q or E so the ball bends back toward the frame after it clears defenders. Confirm the shot label shows INSIDE FOOT CURLED (Left Ctrl toggles shot type).
- Charge to 60–65% and release — Hold Space or Left Mouse Button into the mid-power band. Full power is for special Rocket-driven attempts once aim is proven — not for learning.
Get those four pieces working together and the ball bends around the wall and drops inside the far post with a realistic chance of beating the keeper.
Why mid power wins
Beginners often hold the meter to 90–100% because more speed feels safer. In TFC, excess power amplifies small aim errors: a slightly high line becomes a crossbar kiss, and a slightly wide line flies past the post before Curve can finish the bend. Mid power gives Curve time to work, keeps the ball on a readable arc, and still arrives fast enough to punish keepers who commit early.
When you miss, change one setting. If you raise power and curl and height in the same kick, you will not know which dial fixed — or broke — the shot. That discipline is what separates practice from spam.
Reading wall and keeper together
A goal only counts if the ball clears humans and the frame. Sequence your reads:
- Wall first — If the yellow line intersects a defender torso or head, raise trajectory or widen curl before you think about the keeper. See Beat the Wall.
- Keeper second — After clearances are consistent, attack the open side. If the keeper hugs the near post, curl to the far post. If they sit central, pick a post pocket and bend into it.
- Frame last — Bring ambitious targets back inside the posts when misses go wide; do not add more Power to a line that already leaves the goal.
Perks that raise your finish rate
Two perks dominate scoring conversations:
- Zone — Temporarily lifts Accuracy, Precision, Power, and Curve for the shot on either foot. Safest choice when your card is still developing because every attribute jumps together.
- Rocket — Multiplies launch speed so the ball leaves the foot faster. Your base Power and Precision still govern how true the shot flies, so Rocket rewards clean aim rather than replacing it.
Unlock Perk Points via gameplay and Codes, then confirm current ranking notes on the Tier List. Pair either perk with a card that already has usable Curve if you live on curling free kicks — compare options on Players.
Challenge 1v1 scoring habits
In challenge mode the clock and opponent pressure matter. Pre-bake a default:
- Shot type: INSIDE FOOT CURLED
- Power band: 60–65%
- Height: just enough to clear a standard wall
- Curl: enough to return inside the far post from a near-post start line
On your turn, spend two seconds on keeper position, then execute the default with at most one micro-adjustment. Do not invent a brand-new max-power knuckleball mid-duel unless you have practiced that exact setup offline. Reset with R between custom practice shots so your angle memory stays clean; in a duel, trust the muscle memory you built in the sandbox.
Common misses and fast fixes
| Miss | Likely cause | One change |
|---|---|---|
| Hits wall | Line too flat or too central | Raise W / S or add Q / E curl |
| Over the bar | Power too high or aim too lofted | Drop to 60–65% or lower trajectory |
| Wide of post | Curl too weak or target too ambitious | Increase curl or aim deeper inside the frame |
| Keeper easy save | Target too central | Attack the open post pocket |
| Random spray | Changing three dials at once | Freeze layout; alter one input |
Sibling guides and hubs
- Getting Started — first-hour path and stat balance.
- Controls — charge, curve, height, and camera keys.
- Free Kick Setup — fair layouts and target-first routes.
- Beat the Wall — dedicated wall-clear troubleshooting.
Also redeem Codes, study the Tier List, compare Players, and watch Updates after patches. The Wiki hub ties glossary-style links together.
Master the inside-foot curl at mid power, then layer Zone or Rocket. That is how you score consistently in That Freekick Challenge — in free practice and in challenge 1v1 alike.
Frequently Asked Questions
Quick answers to the most common questions.
What is the best basic scoring shot in That Freekick Challenge?
An inside-foot curl aimed just inside a post, lifted over the wall, charged to about 60–65% power, with Q/E bend bringing the ball back into the frame.
Why not always use full power?
Full power magnifies small aim errors and often sends the ball over the bar or past the post before curve finishes. Mid power is more consistent for learning and 1v1.
Which perks help scoring the most?
Zone boosts all four attributes for the shot and is the safest pick. Rocket adds launch speed once your route already clears the wall and finds the frame.
How do I stop changing too many settings?
Keep wall, keeper, and ball fixed. After each miss, change only height, curl, angle, or power — never several at once — so you know what worked.
Should I aim at the center of the goal?
Usually no. Read the keeper and attack the open post pocket with curl instead of blasting the middle of a set goalkeeper.
Where do I learn the keyboard inputs for curl and height?
Open the Controls guide for the full map. Q/E curve and W/S trajectory are the keys most PC players use while charging with Space or Left Mouse Button.