That Freekick Challenge How to Beat the Wall in TFC
Diagnose wall hits, raise the arc, widen the curl, and clear defenders.
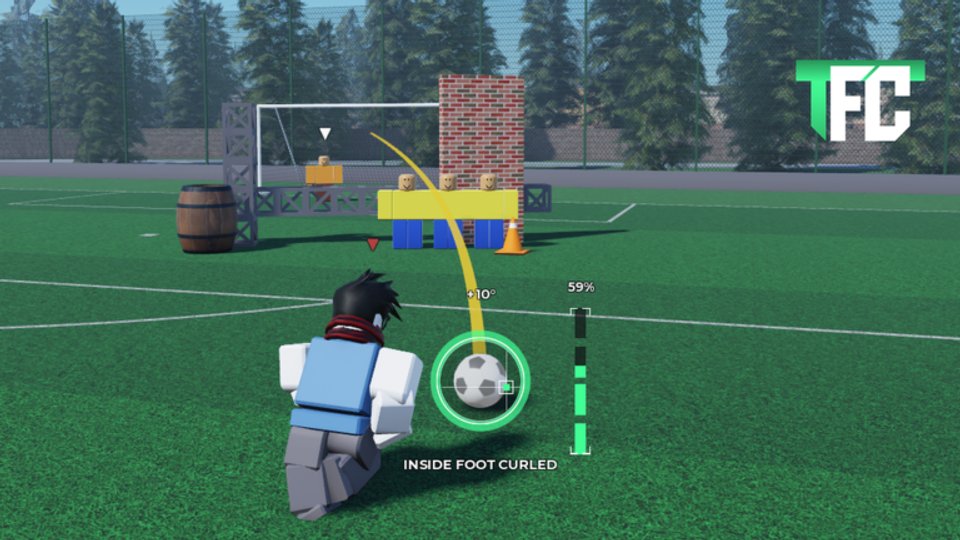
Nothing ends a free kick faster than the first defender’s chest. In That Freekick Challenge, beating the wall is a routing problem: your yellow trajectory must clear human obstacles before Curve and Power ever get a chance to look clever. This guide diagnoses common wall hits, shows the order of fixes, and connects clearance work to the scoring recipe used in challenge 1v1.
If inputs still feel fuzzy, open Controls. For layout habits, use Free Kick Setup. Once clearances stick, finish with How to Score. Brand-new players should start at Getting Started and grab Codes for Coins.
Why shots hit the wall
Most collisions come from one of five mistakes:
- Trajectory too flat — the preview clips a torso or head.
- Line too central — you aimed through the densest part of the wall instead of a gap or over the edge.
- Curl too weak or too late — the bend never pulls the ball off the defender lane.
- Approach angle wrong — A / D never opened a side channel past the wall.
- Power panic — you raised the meter hoping speed would “punch through,” which only makes a bad line fail faster.
Power rarely fixes a wall hit. Height, lane choice, and curl do.
Fix order that actually works
Change one setting per kick while freezing ball, wall, and keeper.
1. Raise the arc (W / S)
Lift until the yellow line clearly passes above outstretched arms. Stop as soon as clearance looks honest — excess loft becomes a crossbar problem later. Re-test at the same 60–65% power band so you isolate height.
2. Move the lane (A / D)
Nudge approach angle to send the early path toward a wall edge or gap instead of the middle jumper. Note the angle number so you can return to it after R resets.
3. Add inside-foot curl (Q / E)
Confirm INSIDE FOOT CURLED with Left Ctrl. Start the line outside or near the wall edge, then bend back toward the far post after the ball clears. Curl that is too aggressive can swing the ball into a different defender — use modest taps.
4. Only then touch power
If the ball now clears but dies or floats, adjust within the mid-power band. Jumping straight to 100% recreates wall hits when the line still clips a shoulder.
Visual checklist before every attempt
- Camera set with C / V so you see wall height and gaps.
- Shot label: INSIDE FOOT CURLED.
- Yellow line: no intersection with defender models on the preview.
- Target: just inside a post, not the keeper’s chest.
- Power: planned percentage written in your head before you hold Space or Left Mouse Button.
Skip the checklist and you will “fix” the same collision for ten kicks without learning why.
Sandbox drill: three clears in a row
- Build a standard wall and set keeper. Do not move them.
- Reset with R, set mid power, raise until the preview clears, add light curl to the far post.
- Score a clearance (ball past the wall, whether or not it goes in).
- Repeat until you string three clearances without touching Power up.
- Only after that streak, refine the finish using How to Score.
This drill builds the exact muscle memory challenge 1v1 needs. Under pressure you will default to lift-then-bend instead of panic-charging.
When the wall is cleared but you still miss
Clearance is necessary, not sufficient. After the ball beats defenders:
- Over the bar — lower loft slightly or drop power toward 60%.
- Wide — aim deeper inside the post or reduce extreme curl.
- Keeper save — attack the open post; do not return to center.
Keep treating these as separate problems. Do not undo a working clearance while chasing a finish.
Perks, cards, and wall work
Zone helps because higher Accuracy, Precision, Power, and Curve make the same clearance route more forgiving. Rocket makes a cleared ball arrive sooner, which matters against keepers — but Rocket on a wall-bound line just creates a louder thud. Unlock points via play and Codes, compare cards on Players, and read priority notes on the Tier List.
Remember the four stats: do not dump everything into Power hoping to blast through humans. Curve and Accuracy are the wall-beater’s friends; Precision keeps timing clean while you focus on the preview line.
Challenge 1v1 wall reads
In a duel, walls may be shorter or differently spaced than your sandbox default. Spend one second asking: flat drive through a gap, or lift-and-curl over the top? If the middle is packed, do not invent a knuckleball through traffic — go to your practiced over-the-top curl. If a wide gap exists, a lower line with modest bend can work, but only if the yellow preview proves it.
Watch Updates after patches that retune physics. Re-run the three-clearance drill whenever the ball “feels different.”
Sibling guides
- Getting Started — onboarding and fair practice habits.
- Controls — W/S height, Q/E curl, A/D angle, R reset.
- Free Kick Setup — target-first layouts and frozen tests.
- How to Score — far-post curl finishes after you clear.
Also browse Scripts carefully if you explore community tools, and the Wiki hub for overview links. Beat the wall on purpose: raise, open a lane, bend, then power. That sequence turns That Freekick Challenge’s hardest early frustration into a solved mechanic.
Frequently Asked Questions
Quick answers to the most common questions.
My free kicks keep hitting the wall. What should I change first?
Raise trajectory with W/S until the yellow line clears defender height. Do not increase power until clearances are consistent.
Can more Power punch through the wall?
Almost never. Extra power usually makes a colliding line fail harder. Fix height, lane, and curl first.
How does inside-foot curl help against the wall?
Start the path toward a gap or over the edge, then use Q/E bend to bring the ball back inside the far post after it clears defenders.
What practice drill builds reliable clearances?
Freeze wall and keeper, reset with R, and earn three wall clearances in a row while changing only one setting per miss and holding mid power.
Which perk helps if my clearances are messy?
Zone boosts all four attributes for the shot and forgives small errors. Rocket is better after the ball already clears and you want faster arrivals.
Where should I go after I beat the wall consistently?
Open How to Score to lock the 60–65% far-post curl finish, and Free Kick Setup to keep practicing with fair, frozen layouts.