That Freekick Challenge Controls
Charge, curve, height, approach angle, and camera shortcuts for TFC.
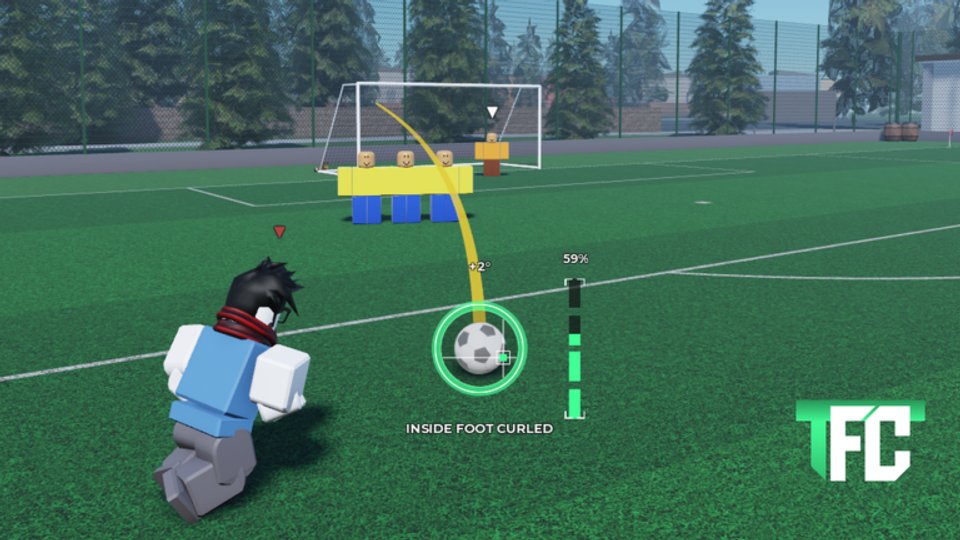
Clean inputs win free kicks. That Freekick Challenge shows a yellow trajectory, angle value, power percentage, and shot-type label on every attempt — but you still need to know which keys move those dials. This controls guide documents the common PC keyboard and mouse map players report for TFC. Live on-screen prompts can vary after updates or on different devices, so treat the table as a tested starting point and confirm anything that does nothing in your session.
Pair this page with Getting Started for onboarding, Free Kick Setup for layout logic, How to Score for the curling recipe, and Beat the Wall when defenders block the line.
Core input map
| Action | Input |
|---|---|
| Charge and kick | Hold Space or Left Mouse Button |
| Curve left / right | Q / E |
| Lower / raise trajectory | W / S |
| Step and approach angle | A / D |
| Toggle shot type | Left Ctrl |
| Reset ball setup | R |
| Camera / zoom | C / V |
| Toggle wall / light | B / G |
| Open menu | M |
If a key fails, stop mashing during a timed challenge turn. Open the menu with M, check Settings, and read the prompt beside the ball. Controller and touch layouts differ; this wiki page focuses on the PC map above.
Charge and release
Hold Space or Left Mouse Button to fill the power meter, then release to strike. The meter percentage is your primary feedback. For learning and most challenge 1v1 finishes, release around 60–65% as taught in How to Score. Holding to 100% is a deliberate choice after your route is proven — often with Rocket equipped — not the default.
Practice the timing window separately from aim. Precision on your card widens the clean-contact zone; Accuracy keeps the ball nearer the yellow line. Do not confuse a mistimed release with a bad curve setting.
Curve with Q and E
Q and E bend the shot left or right for inside-foot curls. The reliable scoring pattern starts the yellow line near one post or outside the wall lane, then uses curl to drag the ball back inside the far post after it clears defenders. Toggle with Left Ctrl until the label reads INSIDE FOOT CURLED before you fine-tune Q / E.
Small taps beat huge swings. Over-curving can bend the ball back into the wall or past the far post. Change curl in modest steps while freezing height and power so you learn how far each tap moves the landing spot.
Trajectory height with W and S
W and S raise or lower the arc. Flat shots that look clever on an empty goal often smash the first wall player. Raise until the preview clears heads and outstretched arms, then stop — extra loft without purpose becomes an easy bar miss. When wall collisions persist, prioritize height and approach angle before more Power; details live in Beat the Wall.
Approach angle with A and D
A and D adjust your step and approach angle around the ball. Use them to open a lane past the wall edge or to change the contact geometry for a stronger curl. Note the on-screen angle number after each nudge so you can return to a known good value with R resets during practice.
In challenge 1v1 you may not rebuild props, but the same A / D micro-moves still reshape the run-up. Keep adjustments tiny under pressure.
Shot type, reset, camera, and toggles
- Left Ctrl cycles shot types. Learners should stay on INSIDE FOOT CURLED until they can score consistently.
- R resets the ball setup — mandatory for fair testing so you are not comparing apples to moving oranges.
- C / V control camera and zoom so you can read wall gaps and keeper shading without guessing.
- B / G toggle wall or lighting helpers in sandbox setups when you need a clearer view of the route.
- M opens the menu for Settings, codes entry (see Codes), and other Misc options.
Use camera freedom before every serious attempt. A bad camera angle hides whether the yellow line truly clears the wall.
Practice drill with controls only
- Reset with R and set INSIDE FOOT CURLED.
- Place the yellow line just inside the far post using A / D and light Q / E.
- Raise with W / S until the preview clears the wall.
- Charge to 60–65% and release.
- On a miss, change only one key family — height, curl, angle, or power — then repeat.
Run this drill before spending Coins. When you are ready to upgrade, redeem Codes, compare cards on Players, and pick Zone or Rocket from the Tier List so perks multiply clean inputs instead of masking messy ones.
Sibling guides
- Getting Started — session order and stat advice.
- How to Score — full curling free-kick recipe.
- Free Kick Setup — wall, keeper, trajectory, and fair tests.
- Beat the Wall — fix defender collisions with height and bend.
Also browse Scripts, Updates, and the Wiki hub for extras and patch notes. Master the control table first; every advanced free-kick tip on this wiki assumes you can charge, curve, and lift on command.
Frequently Asked Questions
Quick answers to the most common questions.
How do I charge a free kick in That Freekick Challenge?
Hold Space or Left Mouse Button to fill the power meter, then release to strike. Most consistent finishes use about 60–65% power.
Which keys add curve and change height?
Q and E curve left or right. W and S lower or raise the trajectory. Confirm with the yellow line and live prompts if a key does nothing.
How do I switch to inside-foot curled shots?
Press Left Ctrl to toggle shot type until the label shows INSIDE FOOT CURLED, then fine-tune curl with Q or E.
What does the R key do?
R resets the ball setup so you can repeat the same starting position during fair practice tests.
Do these controls work on mobile or controller?
This page documents the common PC map. Mobile and controller prompts differ — always follow the on-screen hints for your device.
Where do I open the menu to redeem codes?
Press M for the menu, then use Misc / Settings as shown in-game. Full redemption steps and active codes live on the Codes hub.